


%20v2.webp)
The first 90 days of customer onboarding are critical—the clock is ticking from day one. If your new customers don't see value quickly, you've already lost them.
The problem is that customer onboarding can go off the rails fast when your processes are all over the place.
If every CSM and implementation specialist follows a different playbook (or worse, has no playbook at all), things slip through the cracks.
And customers feel it.
From copy-pasting data, setting up accounts one by one, and endless email chains, onboarding is full of repetitive tasks. These tedious tasks slow everything down and make onboarding way harder than it needs to be.
To avoid these pitfalls, we’re sharing every step that should go on your team’s customer onboarding checklist, and why.
👉 Just looking for a ready-to-use client onboarding checklist?

Grab Dock's free client onboarding checklist or use this (deeply inferior) Google Doc version.
Why every CS team needs a client onboarding checklist
Ever gone to the supermarket without a shopping list? You walk in for “just a few things” and walk out with six bags of snacks, no actual dinner ingredients, and a sinking feeling that you forgot something important.
Customer onboarding without a checklist is the same chaos.
You might overdo some steps, completely forget others, and leave your customer wandering the aisles of confusion. A solid onboarding checklist keeps you on track, ensuring nothing essential gets missed.
There are many benefits to a great onboarding checklist:
- Set clear expectations from the get-go to boost satisfaction and reduce churn.
- It ensures key milestones in the customer journey are hit.
- It keeps key client details accessible during team handoffs.
- It prevents clients from repeating themselves with new team members, which in turn builds trust with clients.
But keep in mind:
Success in onboarding isn’t just about task completion rates. Are customers adopting the product? Are they reaching their first value milestone? These are the metrics that really matter.
Why spreadsheets & project management tools fall short
Most CS teams default to using internal-facing tools like spreadsheets or project management software for client onboarding, but that approach overlooks a crucial factor: the client experience.
While these tools might help your team stay organized, they don’t offer customers a clear, guided path through their own onboarding steps.
Spreadsheets lack visual clarity
Most onboarding teams we talk to start by managing tasks with a spreadsheet. But spreadsheets quickly become messy, and make it hard for customers to visualize their progress. They are not designed to impress.
If you’re a new customer, how does a list of tasks in rows and tabs help you see value or guide you to the content you need?
Brittany Soinski, Manager of Onboarding at Loom, explained how moving away from using spreadsheets impacted their client relationship:
“Spreadsheets are lacking the really important visual element. We didn't have a way to embed a Loom in there. We couldn't visually tell our story. Our research at Loom shows that hyperlinking somewhere is not effective.
Embedding a video can increase your clickthrough rate on any of your content by quite a lot. We were really doing ourselves a disservice by not having our visual content front and center.”
— Brittany Soinski, Manager of Onboarding at Loom
💡 Takeaway: Spreadsheets may help teams stay organized, but they fall short when it comes to showing customers the value of a product.
Project management tools are too complex
Project management tools weren’t built with the customer experience in mind.
They often lack intuitive, client-facing features, leaving customers feeling lost or dependent on endless email threads for guidance. Not to mention, customers need to create a login to these tools, creating unnecessary friction.
Clients don’t want to learn a PM tool just to figure out their next onboarding step, especially during their first interaction with your product. This demotivates customers, leads to disengagement, and increases churn.
This is exactly what happened during Assignar’s initial onboarding process:
“Customers were telling us ‘We don't know what to expect. We don't know where we're going next.’ I was experimenting with Jira and Asana and arrived at the conclusion that they were too clunky.
Inviting a customer to an Asana board just didn't make sense for our type of customers who aren't used to tools in general.
— Rachel Jennings-Keane, Global Head of Customer Success at Assignar
💡 Takeaway: Without clarity and structure, customers disengage. An onboarding checklist needs to be simple, visual, and action-oriented.
Collaborative, visual onboarding checklists lead to successful onboarding outcomes
By shifting the focus from internal-only checklists to a shared, transparent process, businesses can not only streamline onboarding but also surprise and delight clients with a smoother, more intuitive experience.
Unlike general project management tools (or even worse, spreadsheets), customer onboarding tools like Dock are built with client onboarding in mind, giving clients a great experience and clear next steps.
“Before Dock, onboarding was happening all over the place, within our CRM, within Excel—some people had Google Docs. We needed more of a shared plan so the customer could really buy in and get into the onboarding and feel like they were contributing to [the plan] as well.”
— Noah Massucci, Director of Sales Engineering and Customer Onboarding at Robin
In Dock, you can do things like:
- Make some onboarding tasks internal-only, so they still get done but don’t distract or overwhelm your clients.
- Create customer-facing tasks your client can see and act on, increase transparency and partnership throughout the onboarding process.
- Communicate and collaborate directly from the checklist with rich-text comments and tagging.
- Embed files, like training resources or help articles.
- Show clients what to expect throughout the process (in an environment that’s way more professional-looking than a spreadsheet).
What to include in your new client onboarding checklist
If you’re feeling lost, we’ve created this onboarding checklist that you can steal and adapt as needed (or you can use this Google Doc version if you prefer it).
As you’re building your own checklist, we recommend a phased implementation approach. This makes it much easier for customers to understand their current position in the onboarding journey and anticipate what comes next. There are a few ways to phase onboarding:
- Feature-based phasing: Break implementation into phases based on product feature adoption. This way, you can steer customers to use your stickiest features first.
- Milestone-based phasing: Alternatively, you can design the journey around adoption milestones or simply work from a task-based onboarding checklist.
Let’s walk through what you should include in each phase of your onboarding program.
Phase 0 - Internal admin tasks
Customer onboarding begins well before your kickoff call or your welcome email.
Here are some typical tasks from this phase:
☐ Assign customer success manager (CSM) to new client
☐ Add client to your admin tools (Slack, PM platform, time tracker)
☐ Handoff meeting between Sales and Customer Success
☐ Verify billing and contract details
☐ Send onboarding questionnaire to client
☐ Enable relevant product features based on plan
To start onboarding on the right foot, you have to get organized internally. Whether you’re a SaaS company or an agency, your goal is to make sure every person on your team has what they need to make the client’s life easier.
Everything you’ve learned throughout your customer relationship, from their goals to past challenges to basic contact information, should be available to anyone who will work with them.
Traditionally, this phase would center around a handoff meeting from Sales to Customer Success, after the deal closes and the prospect becomes a customer.
But the B2B customer journey isn’t that simple anymore. You might be onboarding a client to a free trial plan or proof of concept project before they pay a single invoice, or welcoming someone who’s already a paying customer to an upgraded plan.
Whatever stage of the journey the handoff happens at, consolidate all customer data in a centralized, virtual space.
Dock workspaces are an ideal solution because they’re designed for both the internal and client-facing touchpoints of the customer journey, including the sales process.
At this stage, you’ll also want to add the client to all the internal admin tools you rely on. That could mean making client profiles in your invoicing system, time tracker, or project management system.
.png)
Dock Tip: Brand your workspaces
Work with your brand or marketing team to make your onboarding space look and feel like your company. Onboarding isn’t just about logistics, it’s a chance to reinforce brand trust.
Phase 1 - Partnership kickoff
Next, make sure your client is well-prepared for active, hands-on learning. Some common tasks during this phase include:
☐ Send welcome email
☐ Share link to client workspace/portal
☐ Schedule kickoff call and launch date
☐ Confirm client stakeholders and contact information
☐ Share your team’s contact information with the client
☐ Confirm the best communication channels with the client
☐ Share package of training content and resources
☐ Outline onboarding process and product success plan
☐ Define client’s key goals, outcomes, and KPIs
☐ Onboarding steps
☐ Schedule follow-up emails to check in on progress/satisfaction
Welcome emails are a familiar part of the customer onboarding process. But rather than sending an overwhelming welcome email, it’s better to send a comprehensive ‘welcome package.’
For example, Assistantly sends each new customer a Dock onboarding workspace within 24 hours of the kickoff call. Timeliness here sets the tone for a smooth, responsive experience.
Include resources to educate your client on what’s coming. Share an overview of what to expect throughout the onboarding process, including the different phases you’ll work through together.
Complement this stage of onboarding with content like:
- Product walkthrough videos
- Product intro deck
- Tutorials/ebooks specific to the client’s use case
- Knowledge base or resource library
.png)
Dock Tip: Hide internal tasks from clients
Dock lets you create internal tasks that are only visible to your team, so you can manage behind-the-scenes work without cluttering the client’s view.

Phase 2 - Admin and manager onboarding
Once the groundwork is laid, it’s time to onboard key stakeholders and configure your product or service to fit the client’s needs. This phase often includes importing essential data—such as user lists, team structures, and company files—so the system is prepped for use.
On the client end, admins may need to set up dashboards, define reporting structures, and integrate tools to ensure seamless data flow. By completing these steps early, you empower managers and administrators with a smooth, structured onboarding experience.
Within your client’s organization, there will be a few points of contact who need to know your product better than anyone. They’ll be the closest to its implementation.
Put time and energy into getting your champions (influential power users) onboarded and fully comfortable with the product first. This will have a waterfall effect across the entire organization, boosting the odds of long-term success.
Common tasks you may need during this phase include:
☐ Hold kickoff call
☐ Set deadlines for action items
☐ Conduct live training session(s) for admins and managers
☐ Install/launch the tool with managers
☐ Hold technical meetings to help with setup and hands-on product education
☐ Help client set up workflows and customize the system/get value from the product
☐ Conduct user testing to ensure admin or manager processes are running smoothly
☐ Guide client through inviting and onboarding users
☐ Schedule and conduct admin training session
☐ Set up single-sign on (SSO)
☐ Upload user list
☐ Create teams & roles
☐ Upload company data file
☐ Configure integrations
Use your scheduled calls as a chance to walk through the training resources available. Which areas of your product does the client seem most unsure about? Do any processes still need clarification?
Dock Tip: Embed content
Share the most valuable resources your client will need directly in your onboarding workspace. While having a robust help center is great for onboarding, embedding the key resources directly into your workspace reduces the effort for your clients.

Remember, the admin users will help train and onboard their own team members, too. In addition to understanding their own workflows, they’ll need a big-picture understanding of the different roles and tasks it will take to get the most value from the product or service.
While they don’t need to know everyone’s duties inside and out, they should understand how they’ll all work together to see ROI from your product. Give them access to everyone’s training materials, so they can go through them at their discretion.
Complement this stage of onboarding with content like:
- Product training decks
- Interactive guided walkthrough
- Sample recurring workflow (if delivering services)

Phase 3 - Training & Testing
Once key users are familiar with your product, it’s time to roll it out across their entire organization. If you’ve laid a strong foundation with plenty of education and admin or manager onboarding, this phase should feel natural and painless.
☐ Hold training on key workflows their team will use to complete crucial tasks
☐ Perform user testing or pilot projects
☐ Share training videos and tutorials for different roles
☐ Assign hands-on tasks or sandbox exercises
☐ Confirm access and roles for all users
☐ Test for technical readiness, making sure the setup and integrations work as expected
☐ Collect user input on pain points during testing and resolve issues before going live
Depending on the nature of your client’s organization, administrators or managers might be playing a more active role in onboarding individual users, supported by the training materials you’ve provided.
In a high-touch setting, user onboarding might look like a hands-on, collaborative guided walkthrough or tutorial. In more low-touch onboarding, it could be self-guided, through means like sharing video tutorials for key workflows and giving users access to a knowledge base.
Either way, make sure users know help is available and where they can find it, whether that’s the product champion, their own manager, or the CSM or Support team on your end. Providing quick and easy help alongside great training is how you turn newbies into loyal customers.
Dock Tip: Use role-based pages
If you’re onboarding several different user roles or teams, segment your Dock workspace into role-based pages to give each end user type quick access to the relevant content and tasks for them.
Phase 4 - Launch
In the launch phase, it’s essential that your customer is actively involved in the rollout process. You’ll play a key role in supporting them as they roll out the product or service to their team or customers.
Remember, onboarding is fundamentally a change management process. To be successful, you and your customer need to collaborate on creating buy-in, communicating clearly, and driving the behavior changes necessary across their organization.
Common onboarding tasks during the launch phase include:
☐ Conduct final user acceptance testing (UAT) or final QA with the customer.
☐ Verify all users have login credentials and correct access permissions.
☐ Run an internal go-live review with onboarding, CS, and support teams.
☐ Brief your support team on launch details, known risks, and customer context.
☐ Host a launch call or send launch communication to the customer.
☐ Reconfirm mutual success plan and key goals with the customer.
☐ Monitor product usage in the first 24–72 hours post-launch.
Lastly, the launch is also the moment to be respectfully assertive. In the early days, customers might miss a few steps and promise to catch up later. But that accountability tends to fade over time, eventually turning into a vague “it’s not working” if they haven’t done their part.
Because launch usually has a hard due date, leading up to launch is the perfect time to bring in more accountability and ensure all onboarding tasks are completed.
Dock Tip: Use timelines to show progress
Be like Assignar and use visual checklists and progress bars to break down complex onboarding into digestible chunks, helping to build momentum and encourage ongoing participation.

Phase 5 - Post-Launch Support
Completing your onboarding doesn’t mean you lose touch with your clients. Keep the lines of communication open as your relationship evolves!
Your post-launch checklist phase will depend a lot on your product or service, but you’ll likely include tasks like:
☐ Conduct quarterly reviews
☐ Track outcomes, celebrate wins, and suggest ways to improve results
☐ Send monthly surveys to assess client success/satisfaction (e.g., NPS)
☐ Monitor payments and invoicing
☐ Discuss cross and upsell opportunities with Sales
☐ Schedule renewal conversation(s)
Keep a finger on your client’s pulse with tools like NPS surveys and honest chats about progress and results. Are they loving it? Just surviving? What wins can you celebrate and what’s still a work in progress?
At the end of the day, it’s not just about hitting goals (although yes, do that!). It’s also about making sure those goals still make sense. As your client grows, pivots or evolves, the goals for your product or service should keep up and stay just as relevant.
Dock Tip: Transition to a client portal
After go-live, connect your onboarding workspace to a Dock client portal to embed dashboards, track progress toward goals, and action renewals—all in one place that’s familiar to your clients.

Quick tips for creating great onboarding checklists in Dock
If you’re using Dock to host your client onboarding checklist, here are seven tips that will help you give your client a great onboarding experience.
1. Make client onboarding more engaging with embedded content
Live training can accelerate product adoption—but it’s also costly and time-consuming, and not always the most effective way to onboard customers:
[Live training] is expensive and time-consuming. And it's not necessarily better. You can have the sense that people are there, and therefore they're definitely going to get trained because their butt has to be in the seat. [However] they probably are multitasking in some way.
— Rachel Provan, Customer Success Leader, and founder of Provan Success
Instead, a more effective approach is to deliver training in bite-sized, async formats like videos, step-by-step guides, and interactive checklists.
This allows users to learn at their own pace and revisit content when needed, so live or in-person sessions focus on high-value discussions, not repeat explanations.
For instance, use Dock to embed Loom videos directly within the onboarding checklist.

2. Use CTA buttons to make other resources more accessible
Embedding content is great, but Dock gives you other great options for more flexibility. Use CTA buttons to give clients one-click access to schedule meetings or review documentation.
This reduces the effort for your clients, increasing the odds they’ll actually complete their assigned onboarding tasks.

3. Phase your plan for easier consumption
We touched on the concept of breaking onboarding into different phases above, but Dock makes it easy to go even further. For instance, you can hide future phases so that you don’t overwhelm your new clients, only revealing them when they actually become relevant.
A phased implementation plan optimizes time-to-value (TTV) by strategically introducing high-impact features first, building towards mastery, driving early engagement and long-term adoption.

4. Let clients add their own to-dos
Onboarding is a partnership, especially when you’re a high-touch SaaS company or providing a white-glove service.
When you use Dock’s onboarding portals, you can allow clients to add their own tasks directly in their onboarding checklist. This keeps everything in one place, eliminating the need for them to track their responsibilities elsewhere.
By giving clients ownership, you increase engagement, ensure alignment, and make the experience more collaborative, ultimately leading to smoother adoption and faster TTV.

5. Scale onboarding with automation
Don't start from scratch with every new onboarding. Using a customer onboarding template for every client can save you a ton of time, since 90% of your onboarding tasks are probably the same from customer to customer.
So ask yourself:
- What am I doing that is repeatable?
- What are the questions I'm answering over and over?
- What are the trainings I'm leading over and over?
Use your answers to build evergreen content that can be reused over and over, and use automations to save time on repetitive tasks.
For instance, with Dock AI, you can convert Gong recordings into a project plan or list of action items—and then embed it into your onboarding workspace.

6. Visualize progress with timelines
Tracking progress throughout the onboarding helps the customer stay on the same page with your team, increasing understanding of whether they’re going to hit the goals and deadlines you discussed in the kickoff.
For instance, Noah Massucci from Robin always tracks customer actions and highlights key steps to meet deadlines. For example, if a customer isn’t completing the necessary steps, the team has visibility into this potential red flag.
With Dock, you can also use Project Timelines to see a high-level overview of each phase in the onboarding process, making it easier for both you and customers to track progress at a glance and automatically sync key milestones.
7. Automate reminders to keep customers on track
Whether you're managing multiple projects or a single workspace, setting due date reminders ensures nothing slips through the cracks. Just toggle your preferred reminder frequency in the settings and let Dock handle the rest!

Set up global or workspace-specific reminder cadences to get notified before, on, or after a task’s due date. This simple feature ensures tasks stay on schedule without manual follow-ups, helping you keep your action plans organized and on track.
How to create client onboarding checklists with AI
The Dock AI widget allows you to fully customize workspaces to fit your customer onboarding plan, simply by picking a source to generate the content you need in moments.
Here’s how it works.
1. Select the Dock AI Widget
In the workspace editor, click on Add Section and select Dock AI from the list. Or, create a new and click Create with AI.

2. Pick a source to feed your onboarding checklist
You can pull your content from various sources:
- Paste text from a meeting summary or notes.
- Upload a document outlining your customer’s needs.
- Upload an existing CSV spreadsheet of client tasks.
- Choose a recent Gong or Chorus call recording.
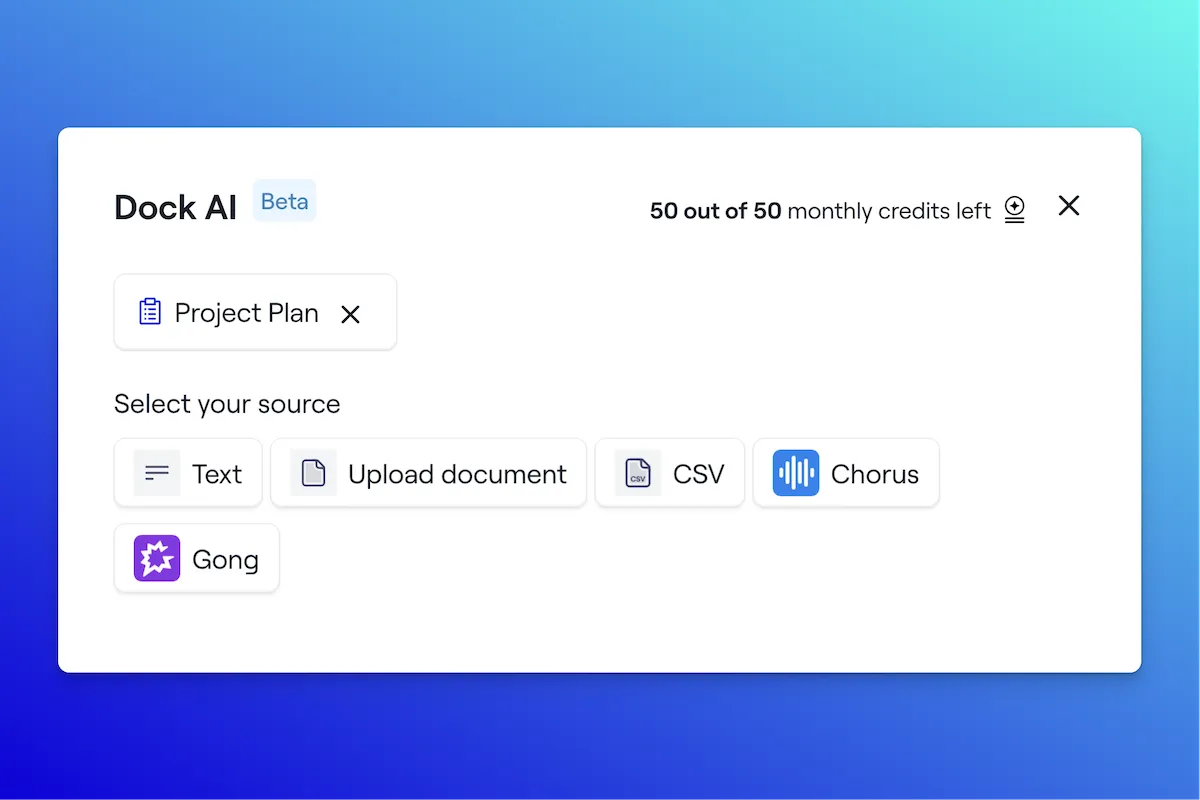
You can also add your own custom prompt, like highlighting key uses for your customer onboarding checklist or calling out the must-have requirements.
3. Generate your client onboarding checklist
Dock AI will suggest different sections for your onboarding checklist. You can then:
- Refine sections with more AI prompts to fine-tune them.
- Add sections one by one to set up your workspace.
- Use the Add All option to drop everything into the workspace at once.
4. Edit your onboarding content in the workspace
Once added to your workspace, the AI-generated customer onboarding checklist sections can be edited and improved just like any other content.
You can tweak the plan, add additional content, or generate new sections as needed, ensuring the final result is clear, actionable and ready to use. If you need more, you can always return to the Dock AI widget to generate more sections.
Create a great onboarding checklist and first impression
Confusion is the enemy of great onboarding and product adoption. That’s why a successful customer onboarding starts with a great customer onboarding checklist.
Your checklist keeps your team and your new client on the same page and on track, helping you navigate the process and setting the stage for great outcomes everyone will be happy with.
Delivering a smooth, intuitive onboarding process makes new customers feel confident, supported, and excited to use your product—not frustrated before they even get started
Try Dock’s customizable customer onboarding checklist now, or sign up for Dock to get your first 50 workspaces for free!


Related Revenue Lab Articles


Templates for Sales, Onboarding,
Projects and Portals
Customize and share with clients


